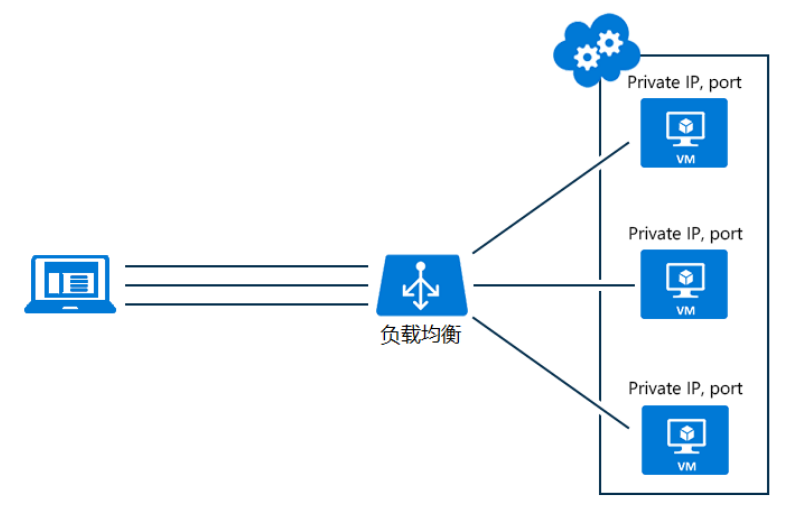
一、负载均衡简介
通俗的讲,负载均衡就是将负载(工作任务,访问请求)进行分摊到多个操作单元(服务器,组件)上进行执行。

二、Ribbon简介
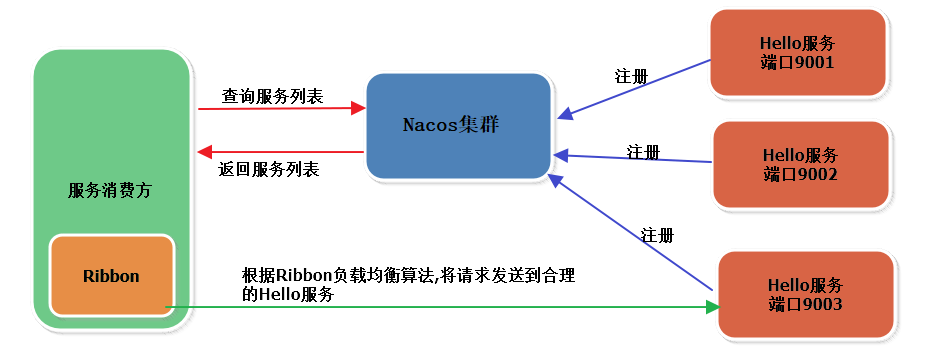
Ribbon 是一个客户端负载均衡器,可让您对 HTTP 和 TCP 客户端的行为进行大量控制。
Spring Cloud Ribbon是基于Netflix Ribbon实现的一套客户端负载均衡的工具。
注意:我们不需要去引入ribbon的依赖,因为在nacos里面已经集成了ribbon的依赖:
Ribbon提供很多种负载均衡算法,例如轮询、随机 等等,默认轮询。

三、Ribbon负载均衡策略
负载均衡接口:com.netflix.loadbalancer.IRule
7中负载均衡策略:
| 策略类 |
命名 |
描述 |
| RandomRule |
随机策略 |
该策略实现了从服务清单中随机选择一个服务实例的功能。 |
| RoundRobinRule |
轮询策略 |
该策略实现按照线性轮询的方式依次选择实例的功能。具体实现如下,在循环中增加了一个count计数变量,该变量会在每次轮询之后累加并求余服务总数 |
| RetryRule |
重试策略 |
在一个配置时间段内当选择Server不成功,则一直尝试选择一个可用的Server |
| BestAvailableRule |
最低并发策略 |
遍历服务提供者列表,如果Server断路器打开,则忽略,再选择其中并发连接最低的Server |
| AvailabilityFilteringRule |
可用过滤策略 |
先过滤掉非健康的服务实例,然后再选择连接数较小的服务实例。 |
ResponseTimeWeightedRule |
响应时间加权策略 |
已经被弃用,作用同WeightedResponseTimeRule |
| WeightedResponseTimeRule |
响应时间加权策略 |
根据Server的响应时间分配权重,响应时间越长,权重越低,被选中的概率就越低。 |
四、Ribbon入门Demo
- RestTemplate上配置@LoadBalanced注解开启ribbon负载均衡,默认轮询策略
- 指定策略注入Bean即可
1. 创建两个Ribbon_provider
此处只放一个Provider供参考
1.1 controller
1
2
3
4
5
6
7
8
9
10
11
12
13
14
15
16
17
18
| import com.example.User;
import com.example.service.UserService;
import org.springframework.beans.factory.annotation.Autowired;
import org.springframework.web.bind.annotation.PathVariable;
import org.springframework.web.bind.annotation.RequestMapping;
import org.springframework.web.bind.annotation.RestController;
@RestController
@RequestMapping("/provider")
public class UserController {
@Autowired
private UserService userService;
@RequestMapping("/getUserById/{id}")
public User getUserById(@PathVariable Integer id){
return userService.getUserById(id);
}
}
|
1.2 service
1
2
3
4
5
| import com.example.User;
public interface UserService {
User getUserById(Integer id);
}
|
1
2
3
4
5
6
7
8
9
10
| import com.example.User;
import org.springframework.stereotype.Service;
@Service
public class UserServiceImpl implements UserService {
@Override
public User getUserById(Integer id){
return new User(id,"admin-1",18);
}
}
|
1.3 SpringBoot App
1
2
3
4
5
6
7
8
9
10
11
| import org.springframework.boot.SpringApplication;
import org.springframework.boot.autoconfigure.SpringBootApplication;
import org.springframework.cloud.client.discovery.EnableDiscoveryClient;
@SpringBootApplication
@EnableDiscoveryClient
public class RibbonProviderApp {
public static void main(String[] args){
SpringApplication.run(RibbonProviderApp.class,args);
}
}
|
1.4 application.yml
1
2
3
4
5
6
7
8
9
| server:
port: 8090
spring:
cloud:
nacos:
discovery:
server-addr: 47.98.105.36:8848
application:
name: ribbon-provider
|
2. 创建ribbon_consumer
2.1 config
1
2
3
4
5
6
7
8
9
10
11
12
13
14
15
16
17
18
19
20
21
22
23
24
25
| import com.netflix.loadbalancer.IRule;
import com.netflix.loadbalancer.RandomRule;
import org.springframework.cloud.client.loadbalancer.LoadBalanced;
import org.springframework.context.annotation.Bean;
import org.springframework.context.annotation.Configuration;
import org.springframework.web.client.RestTemplate;
@Configuration
public class BeanConfig {
@Bean
@LoadBalanced
public RestTemplate restTemplate(){
return new RestTemplate();
}
@Bean
public IRule iRule(){
return new RandomRule();
}
}
|
2.2 controller
1
2
3
4
5
6
7
8
9
10
11
12
13
14
15
16
17
18
19
20
21
22
23
24
25
26
27
28
29
30
31
32
33
34
35
36
37
38
39
| import com.example.User;
import org.springframework.beans.factory.annotation.Autowired;
import org.springframework.cloud.client.ServiceInstance;
import org.springframework.cloud.client.discovery.DiscoveryClient;
import org.springframework.web.bind.annotation.PathVariable;
import org.springframework.web.bind.annotation.RequestMapping;
import org.springframework.web.bind.annotation.RestController;
import org.springframework.web.client.RestTemplate;
import java.util.List;
import java.util.Random;
@RestController
@RequestMapping("/consumer")
public class UserController {
@Autowired
private RestTemplate restTemplate;
@Autowired
private DiscoveryClient discoveryClient;
private int currentIndex;
@RequestMapping("/getUserById/{id}")
public User getUserById(@PathVariable Integer id){
List<ServiceInstance> instanceList = discoveryClient.getInstances("ribbon-provider");
String url = "http://ribbon-provider/provider/getUserById/"+id;
return restTemplate.getForObject(url,User.class);
}
}
|
2.3 SpringBoot App
1
2
3
4
5
6
7
8
9
10
11
12
| import org.springframework.boot.SpringApplication;
import org.springframework.boot.autoconfigure.SpringBootApplication;
import org.springframework.cloud.client.discovery.EnableDiscoveryClient;
@SpringBootApplication
@EnableDiscoveryClient
public class RibbonConsumerApp {
public static void main(String[] args){
SpringApplication.run(RibbonConsumerApp.class,args);
}
}
|
2.4 application.yml
1
2
3
4
5
6
7
8
9
| server:
port: 80
spring:
cloud:
nacos:
discovery:
server-addr: 47.98.105.36:8848
application:
name: ribbon-consumer
|
3. 测试
1
2
3
4
5
6
7
8
9
10
11
12
13
|
{"id":20,"name":"admin-2","age":18}
{"id":20,"name":"admin-1","age":18}
{"id":20,"name":"admin-2","age":18}
{"id":20,"name":"admin-1","age":18}
|
Ribbon负载均衡
https://github.com/i-xiaoxin/2022/10/11/Ribbon负载均衡/

